Closet Office Organization: How to Fit a Workspace in a Closet
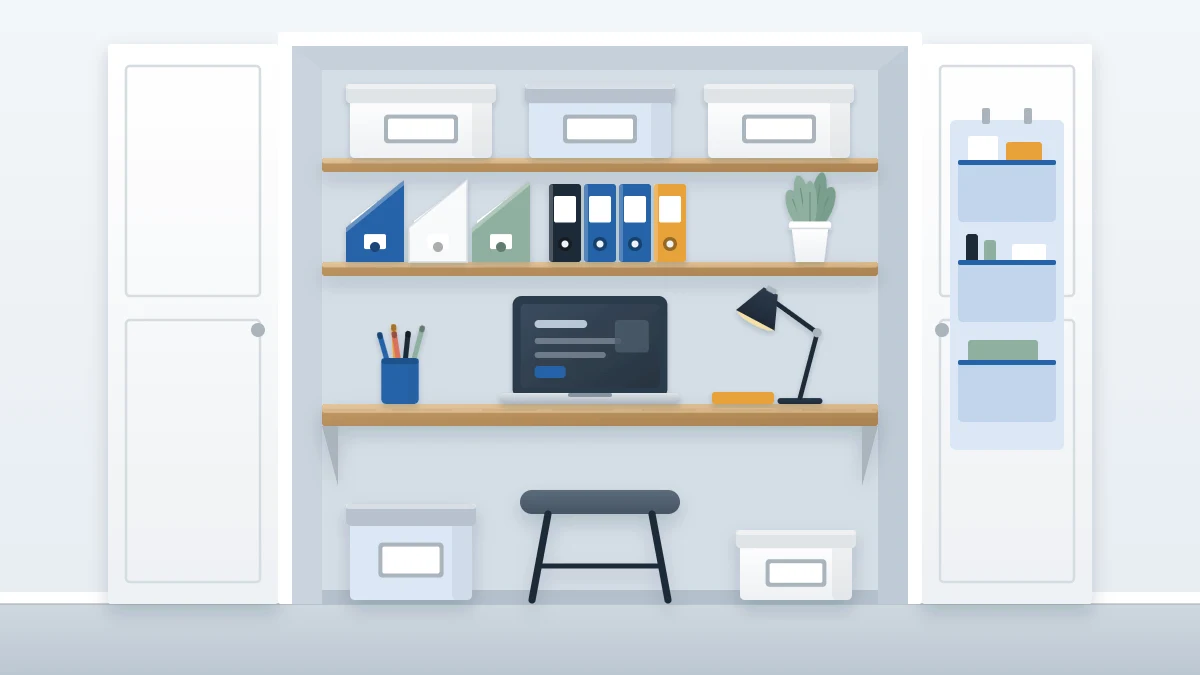
Seven steps to arrange a reach-in closet as an office nook: measure, set the desk height and depth, plan shelves within reach, use the side walls and keep the doors able to close.
At a glance
What you need
- Tape measure, pencil and paper
- Painter's tape
- Narrow desk, table or desktop
- Matching lidded boxes
- Plug-in or battery-powered light
- Soft reusable cable ties
- Labels
A reach-in closet is often the only spare footprint in a home: a few feet wide, a couple of feet deep, with doors that can shut the whole thing away. Fitted out with a desk surface and a few shelves, it becomes a workspace that vanishes when you are done.
Closet office organization depends on planning in three directions, because the walls are so close. The back wall takes the shelves, the side walls take slim storage, and the doorway decides how far the chair and your knees can go. Measure first, then arrange.
Step 1: Gather your tools and measure the closet
You will need:
- Tape measure, pencil and paper
- Painter’s tape for marking heights on the wall
- The chair or stool you plan to use
- Your laptop, lamp and the largest item you need to store
- Matching boxes with lids (buy after measuring)
- A plug-in or battery-powered light
- Soft reusable cable ties
Then take the measurements:
- Empty the closet completely, including the hanging rail if it is removable and you are allowed to remove it.
- Measure the width at the back wall and again at the door opening. The opening is often narrower.
- Measure the depth from the back wall to the inside of the closed doors.
- Measure the height from the floor to any existing shelf and to the ceiling.
- Note where the nearest existing outlet is and how the doors open: hinged, sliding or folding.
Sketch the three walls on paper and write the numbers on the sketch. Sliding doors cover half the opening at all times, so plan the seat for the side that opens.
Step 2: Set the desk surface
Sit on your chair at a table that feels comfortable for typing and measure from the floor to the tabletop. That is your surface height. Mark it on the closet wall with painter’s tape.
For depth, the surface has to hold the laptop and leave room for your wrists, yet stop short of the doors so they can close. Subtract a small margin from the closet depth for the door and its hardware. Then check knee space: with the chair pulled in, nothing below the surface should sit where your legs go.
The surface itself can be a narrow freestanding desk or table that slides into the opening, a desktop resting on two low drawer units, or a wall-mounted desktop on brackets.
Safety note
For a wall-mounted desktop, shelf, rail or hook, follow the manufacturer’s instructions and stated limits and use fixings suited to the type of wall. Closet walls vary a lot. If you rent, check your lease or ask your landlord before drilling, or use freestanding pieces: a narrow table, a small bookcase, a shelf unit that stands on the desk. Heavy items go low, on the floor or the bottom shelf.
Step 3: Plan one or two shelves above
Sit at the marked desk height and reach up toward the back wall. The highest point you can comfortably touch while seated is the top of your working zone. One shelf belongs inside that zone and a second can sit above it for things you stand up to fetch.
- Leave enough clear height under the lower shelf for the open laptop screen and the lamp.
- Keep the lower shelf shallower than the desk so you do not bump your head when leaning in.
- Use the lower shelf for current folders in a magazine file and one box of daily supplies.
- Use the upper shelf for light boxes of rarely used items.
For what to put where, the method for arranging home office shelves by reach and use applies directly.
Step 4: Use the side walls and the door
The side walls are narrow but close to hand, which suits slim, light storage:
- a few removable adhesive hooks for headphones, a lanyard or scissors
- a slim wall pocket for one or two folders
- a small cork or magnetic strip for a calendar and notes
On a hinged door, a pocket organizer that hangs over the top edge holds envelopes, notepads and small tools without any fixings. Check that the door still closes with it in place and that nothing presses against the desk edge.
Step 5: Box the supplies
With so little room, loose items quickly fill the surface. Give every category a box and choose boxes of one size and color, so the shelves look like one tidy block when the doors are open. Measure the shelf depth and the clear height before buying, and label each front.
Keep only a working amount here: one pad, a few pens, a short stack of printer paper. Backup stock belongs elsewhere in the home. The limits that make this possible are covered in the guide to small home office organization.
Step 6: Light and power without wiring
Closets are dim. Choose a light that needs no installation: a small plug-in desk lamp, a clamp lamp on the shelf edge, or battery-powered stick-on lights under the lower shelf, fitted the way their maker describes.
Route the laptop cord and lamp cord to an existing outlet along the back edge of the desk and down one side, gathered loosely with a soft tie. Keep cords clear of the door hinges and track so closing the door never pinches them. Do not overload the outlet or a power strip, and follow the manufacturer’s instructions for the strip and for each device. Never plug one power strip into another, and keep cords out from under rugs.
If the closet has no outlet nearby and you want a new outlet, that is a job for a licensed electrician, not a weekend task. For neat routing along the desk edge, see the steps for desk cable organization.
Tip
A laptop and its charger give off warmth. Leave the doors open while equipment is running or charging, and close them only once everything is switched off.
Step 7: Make sure the doors close on a clear desk
The point of a closet office is that it can disappear. Test it: with everything in place, push the chair or stool under the surface and close the doors. If they catch, something is too deep.
At the end of each session, the surface should hold only the closed laptop and the lamp.
Adapting to a different closet
- Very shallow closet: use a narrower surface and sit with the chair in the room, facing in.
- No doors: hang a curtain on a tension rod, which needs no fixings.
Frequently asked questions
How deep does a closet need to be for a desk?
Deep enough for your laptop and wrists on the surface with the doors still able to close in front. Measure from the back wall to the inside of the closed doors, then test with your own equipment. In a very shallow closet, use a narrower surface and sit with the chair out in the room.
Can I set up a closet office in a rented home?
Yes, with freestanding pieces. A narrow table that slides into the opening, a small bookcase, a shelf unit that stands on the desk, removable adhesive hooks and an over-door organizer need no fixings. Check your lease or ask your landlord before putting brackets or shelves on the walls.
How do I light a closet office that has no light fitting?
Use a light that needs no installation, such as a small plug-in desk lamp, a clamp lamp on the shelf edge or battery-powered stick-on lights under the lower shelf. Run any cord to an existing outlet along the back of the desk, clear of the door hinges.